
How to get Cargonizer Connector
For Business Central Online
If you have Business Central Online, you can get a free 30-day trial. Simply search for Cargonizer Connector in Business Central, or find Cargonizer Connector at Microsoft AppSource.
-
Once you have selected a free trial, search for and open the Cargonizer Connector Setup page.
-
On the ribbon, select Register Trial Subscription. A notification will appear confirming that you now have a trial subscription.
Once you have selected a trial subscription, we will contact you and guide you through the onboarding process.
For Business Central On-premises
If you are using Business Central On-premises, you can get a free 30-day trial or purchase the app. Contact us at post@dynapro.no and we help you with the installation process.
Note
To purchase Cargonizer Connector after the free 30-day trial, contact us at post@dynapro.no.
Setup
To use Cargonizer Connector you need to set up:
-
An API key.
-
Sender ID(s).
-
Number series for transport orders.
-
Transport agreements, products, services & printers.
Optional settings:
-
Auto Sync transport agreements.
-
Set Debug Mode.
-
Check Base URL.
-
Transfer Directly default setting.
API key
An API key is the password associated with your Logistra Cargonizer account that Microsoft Dynamics 365 Business Central uses to authenticate with Logistra Cargonizer.
Find and set up your API key
-
Log in to Logistra Cargonizer, select Preferences.
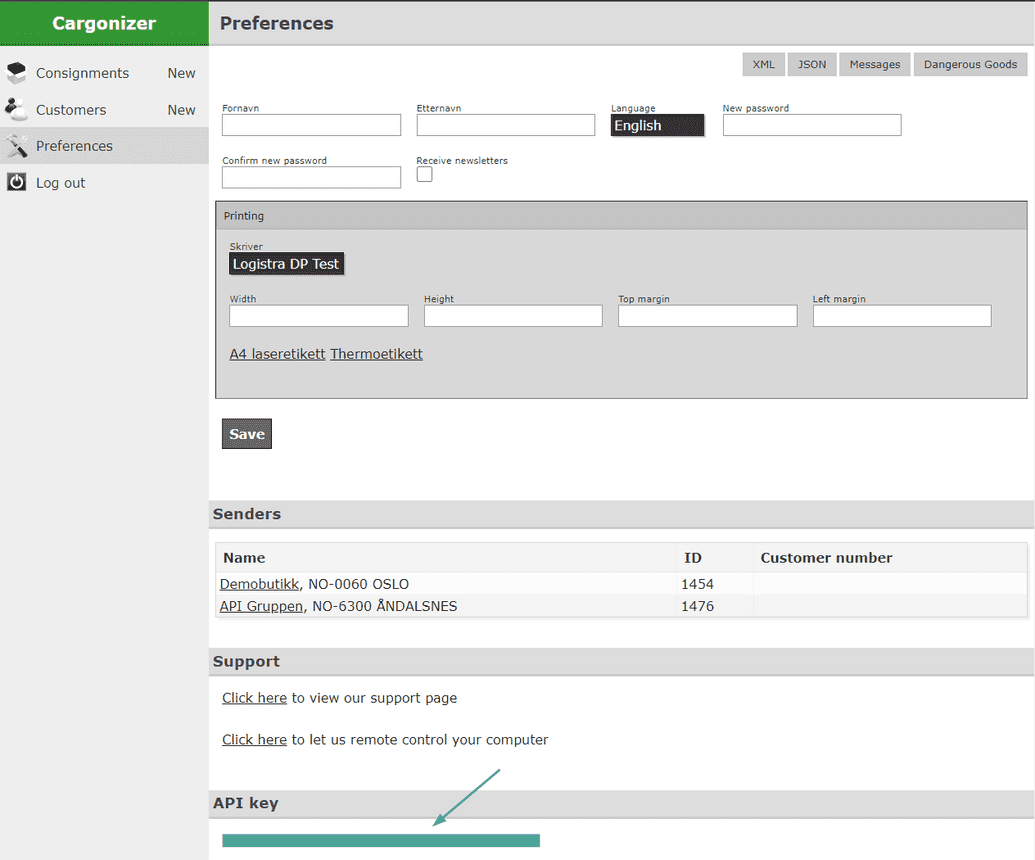
2. The API key is located under the API Key heading, near the bottom of the page. Copy the API key to your clipboard.
3. Open Dynamics 365 Business Central, then search for and open the Cargonizer Connector Setup page.
4. Turn on the Enable Cargonizer Connector toggle, located under the Activate heading.
5. Paste the API key into the API key field, located under the Connections Details heading.
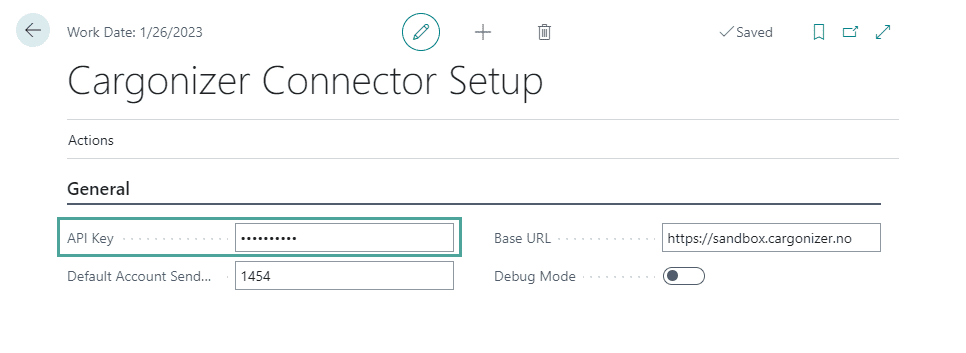
6. Finally, select Actions, located at the top of the page, then select Retreive Cargonizer Account Data.
7. Sign out of Business Central, and then sign in again.
Your API key is now set up.
Sender ID(s)
In Logistra Cargonizer, a sender refers to the pickup location from which you would like your goods to be transported. A sender ID is a four digit number used to identify the sender.
How you set up sender ID(s) will depend on whether you have one or multiple senders. Follow the instructions accordingly.
One sender: find and set up one sender ID
-
Log in to Logistra Cargonizer and select Preferences.
-
Under the Senders heading, find the Name and ID of the sender.
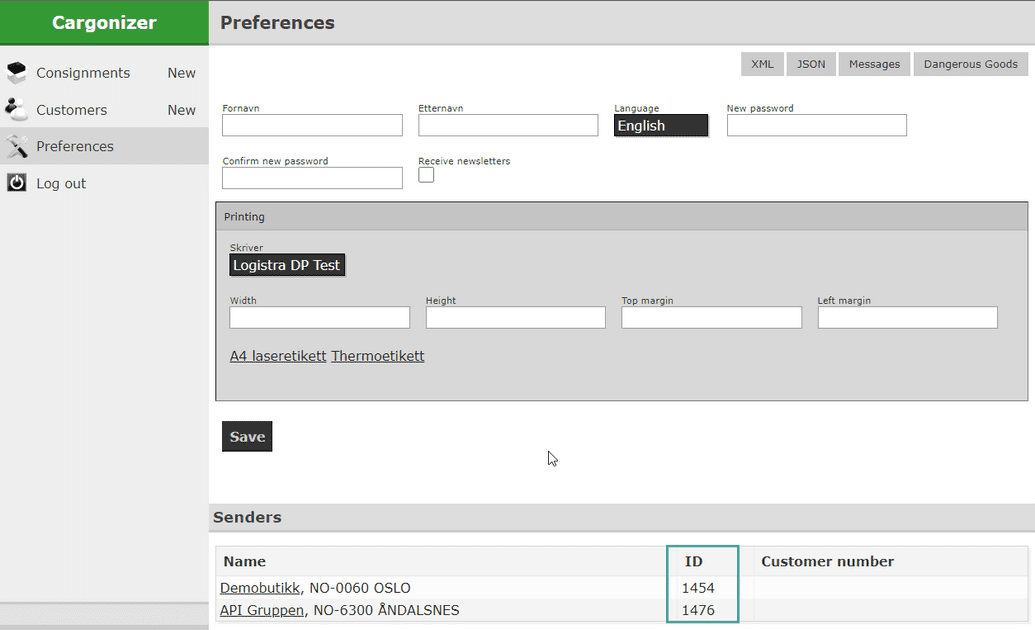
3. Copy the ID to your clipboard.
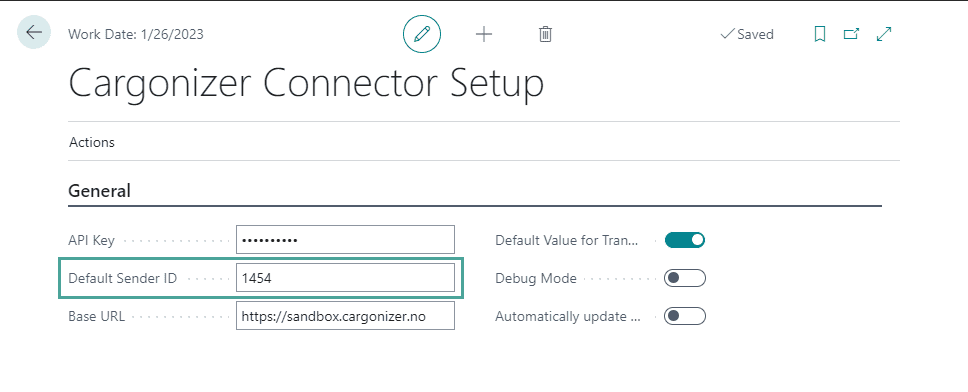
4. In Business Central, open the Cargonizer Connector Setup page.
5. Under the Connection Details heading, paste the sender ID into the Default Sender ID field.
Your sender ID is now set up.
Multiple senders: find and set up multiple sender IDs
Sender IDs from Logistra Cargonizer will need to be added to the location card of the corresponding location in Business Central.
Complete the following steps for every sender you would like to register:
-
Log in to Logistra Cargonizer, select Preferences.
-
Under the Senders heading, find the Name and ID of the sender.
3. Copy the sender ID to your clipboard.
4. In Business Central, search for and open the Locations page.
5. Select the location you want to connect the sender ID to. A new page will open.
6. Under the General heading, paste the sender ID into the Cargonizer Sender ID field.

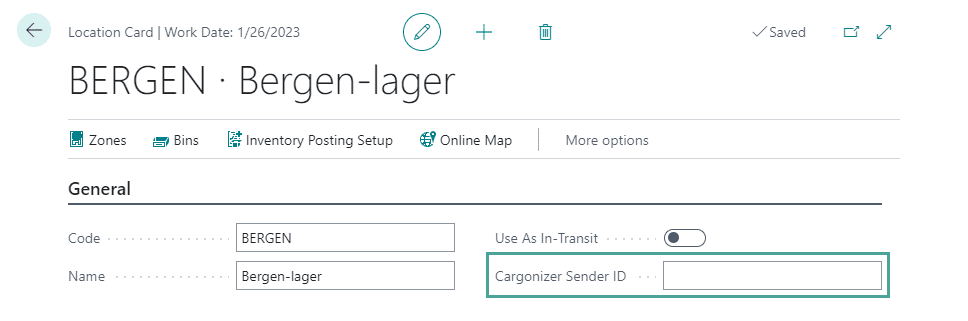
Your sender IDs are now set up.
Import transport agreements, services, products and printers
Use the following instructions to download all tranport agreements, services and products from Logistra Cargonizer. All DirectPrint printers will also be downloaded so that you can use them from Business Central.
Here is how to add your Logistra Cargonizer transport agreements, services, products and DirectPrint printers to Business Central:
-
On the Cargonizer Connector Setup page, on the ribbon, select Actions, then select Retrieve Cargonizer Account Data.
Your Logistra Cargonizer transport agreements, services, products and DirectPrint printers are now set up in Business Central.
Keep your Logistra Cargonizer account data synchronized in Business Central
You can choose to set Cargonizer Connector to automatically update in Business Central any new transport agreements, products and printers added to Logistra Cargonizer.
To do this:
-
Open the Cargonizer Connector Setup page and, under the General heading, turn on the Automatically update Transport Agreements toggle.
-
A window will appear asking you to confirm that you want to create a job queue entry that keeps the transport agreements updated. Select Yes.
Now, any changes to your Logistra Cargonizer account including transport agreements, transport agreement products, units of measure and printers will automatically be updated in Business Central.
If you do not want Cargonizer Connector to automatically update changes to your Logistra Cargonizer account in Business Central, you can update changes manually. Just follow the instructions Import transport agreements, services, products and printers here above, whenever you want to synchronize your Logistra Cargonizer account data with Business Central.
Debug mode
When you enable Debug Mode, the electronic documents sent between Logistra Cargonizer and Business Central will be presented to the user.
To enable Debug Mode:
-
On the Cargonizer Connector Setup page in Business Central, turn on the Debug Mode toggle.
Base URL
On the Cargonizer Connector Setup page in Business Central, there is a Base URL field. You do not need to change this setting, unless you have a test account with Logistra Cargonizer and would like to test the integration.
To test Cargonizer Connector using a Logistra Cargonizer test account, use the following URL: https://sandbox.cargonizer.no.
For production environments you must use https://cargonizer.no
Transfer directly setting
After creating a new transport order you can either send it directly to the carrier, or send it to Logistra Cargonizer for further editing.
Send a transport order directly to the carrier:
-
On the transport order, under the General heading, turn on the Transfer Directly toggle.
Now, when you select Send, the transport order will be sent directly to the carrier.
Note
This setting can be overridden on individual transport orders using the Transfer Directly toggle.
Send a transport order to Logistra Cargonizer for further editing:
-
On the transport order, do not turn on the Transfer Directly toggle.
-
On the ribbon, select Process or Home, then select Send.
-
Finally, on the ribbon, select Navigate, then select Open in Cargonizer.
Note
You need to be logged in to Logistra Cargonizer to be taken directly to the transport order you just sent over for further editing.
Automatically create transport orders when shipping sales orders
Create transport orders
You can set up Cargonizer Connector to automatically create a transport order when a sales order is shipped.
To do so:
-
Go to the Cargonizer Connector Setup page.
-
Under the Automatic creation and sending of Transport Orders heading, turn on the Automatically create Transport Orders when Orders are Shipped toggle.
Now, when a sales order is shipped, a transport order will automatically be created as well. If you would also like transport orders to be sent automatically, see the section Automatically send transport orders when shipping sales orders below.
Note
Once you have set this functionality, it can be overridden on individual sales orders by turning off the Automatically Create Transport Order when Shipped toggle under the Shipping and Billing heading on a sales order.
Note: Any user that ships the sales orders (posts shipping) will also have to have one of the Cargonizer Connector permission sets assigned otherwise this functionality will not work. See permissions for more details.
Automatically send transport orders when shipping sales orders
Create and send transport orders
You can set up Cargonizer Connector to create a transport order and send it to Logistra Cargonizer or the transport agreement automatically when you ship your sales orders.
To do so:
-
Go to the Cargonizer Connector Setup page and, under the Automatic sending of Transport Orders heading, turn on the Automatically Send Transport Order when Shipping toggle.
-
Next, under the General heading, turn on the Default Value for Transfer Directly toggle.
-
Under the Freight Payment heading, fill in the following fields:
-
Default Billing Party
-
Billing Party's Customer No. (only relevant if Default Billing Party is not Consignor)
-
Def. Billing Party's Address (only relevant if Default Billing Party is Third Party)
Note
Once you have set this functionality, it can be overridden on individual sales orders by turning off the Send Transport Order when Shipped toggle under the Shipping and Billing heading on a sales order.
Note: Any user that ships the sales orders (posts shipping) will also have to have one of the Cargonizer Connector permission sets assigned otherwise this functionality will not work. See permissions for more details.
Print labels
If the Automatically send transport orders when shipping toggle is turned on on the Cargonizer Connector Setup page, you can set print labels to print automatically for transport orders once they are created and sent.
To do so:
-
On the Cargonizer Connector Setup page, turn on the Automatically Print Labels toggle.
To be able to print labels automatically, the printer must also be selected on the product for which the transport order is created.
To do so:
-
Search for and open Transport Agreements.
-
Find the desired transport agreement and select it.
-
On the ribbon, select Products.
-
On the page that appears, in the line of the desired product, select the desired service in the Shipping Agent Service column.
-
Finally, select the desired printer ID in the Default DirectPrint Printer column.
One collo per transport order
You can set Cargonizer Connector to automatically calculate the total weight of the items on your sales orders and create a transport order for one collo (packaging unit).
To do so:
-
On the Cargonizer Connector Setup page, turn on the One collo per Transport Order toggle.
You can also select a default unit of measure for all single collo transport orders.
To do so:
-
On the Cargonizer Connector Setup page, in the Unit of Measure for Transport Orders containing one collo field, select a unit of measure from the dropdown list.
Additionally, you can enter a default description for single collo transport orders.
To do so:
-
On the Cargonizer Connector Setup page, enter a description in the Description for Transport Orders containing one collo field.
Important
If you would like to use One collo per Transport Order in conjunction with Automatically Send Transport Orders when Shipping, you must select a Unit of Measure for Transport Orders containing one collo.
This value can be overridden on individual sales (and service) orders in the field Combine Items into One Collo.
Automatically Print Return Labels
You can have Cargonizer Connector automatically print out return labels to put in the package along with your items. To do so on the Cargonizer Connector Setup page:
-
Enable the field Automatically Print Return Labels.
-
Fill in the Default Return Transport Agreement and Default Return Product Code.
-
Select a default printer for Return Labels in the field Default Printer for Return Labels. (Optional)
Now when you send a transport order the return labels will be printed out automatically.
Permissions
Cargonizer Connector comes with two permission sets that need to be assigned to users that interact with Cargonizer Connector:
-
Cargonizer Connector User (for regular users of the app)
-
Cargonizer Connector Admin (for users that need to be able to change the Cargonizer Connector settings)
Who needs a Cargonizer Connector permission?
The following users will need to have a Cargonizer Connector permission, otherwise the app will not work as intended:
-
Any user that uses the Cargonizer Connector functionality directly.
-
Any user that creates new sales orders in the system.
-
Any user that ships sales orders / posts shipping (only applies if Automatically Send Transport Orders when Shipping toggle is turned on).