
Get started with Online Production Control
For Business Central Online
If you have Business Central Online, you can get a free 30-day trial. Simply search for Online Production Control in Business Central, or find Online Production Control at Microsoft AppSource.
-
Once you have selected a free trial, search for and open the Online Production Control Setup page in Business Central.
-
On the ribbon, select Register Trial Subscription. A window will appear confirming that you now have a trial subscription.
Once you have selected a trial subscription, we will contact you and guide you through the onboarding process so that you will be able to use Online Production Control.
For Business Central On-premises
If you are using Business Central On-premises, you can get a free 30-day trial or purchase the app. Contact us at post@dynapro.no and we help you with the installation process.
Note
To purchase Online Production Control after the free 30-day trial, contact us at post@dynapro.no.
Setup and functionalities
Activate Online Production Control
-
Once we have guided you through the onboarding process, search for and open the Online Production Control Setup page.
-
Turn on the Enable Online Production Control toggle.
Select the Online Production Control role
-
Select the Settings icon and select My Settings from the drop down list.
-
On the page that appears, in the Role field, select Online Production Control.
Connect a machine center to Online Production Control
-
Search for and open Machine Centers, and select the machine center you would like to connect to OPC.
-
On the Machine Center card, under the General heading, enable the Show in OPC toggle.
Track time
If you would like to track the time for the machine center in OPC, you need to enable the Clocking toggle, also located under the General heading on the Machine Center card.
Filter out irrelevant operations, capacity entries and information board entries
To see only the operations, capacity entries and information board entries related to the current user on the OPC role center:
-
Search for and open User Setup.
-
Select your user from the list.
-
Fill out the OPC Capacity Type Filter, OPC Capacity No. Filter and OPC Work Group Filter fields with the values of the work center or machine center, and work center group for which you would like to see the operations.
Quickly post the output and scrap for an operation
Setup
To quickly post the output and scrap for an operation, you must first select the journal you would like to use. This only needs to be done once.
To do so:
-
Search for and open Online Production Control Setup.
-
Fill out the Output Jnl. Template Name Qty and Output Jrn Batch Name Qty fields.
How to post output and scrap
-
On the OPC Role Center, select the Post Output action.
-
On the page that appears, fill in the Production Order No. and the Operation No. fields.
-
In the Output Quantity field, type in the output quantity.
-
If you need to register scrap, fill in the Scrap Quantity, Scrap Code and Scrap Comment fields.
Require the user to be clocked in when registering time
-
Search for and open Online Production Control Setup.
-
Enable the Time Registration Card Required toggle.
It will now only be possible to register time on an operation when a user is clocked in.
Quickly register time and output on an operation
Setup
To quickly register time on an operation, you must first enable these functions.
To do so:
-
Search for and open Online Production Control Setup.
-
Fill in the Output Jnl. Templ. Name Time and Output Jnl. Batch Name Time fields.
How to start registering time on an operation
-
On the Role Center, select either the Firm Planned Operations or Released Operations operation cue.
-
On the page that appears, select an operation from the list. Then, on the ribbon, select Start/Stop Time.
-
A new page will appear. Fill in your employee number in the Register employee field and press Enter on your keyboard or select Register on the ribbon.
Time registration for the operation has now started.
How to register output on an operation
If you would also like to register output, you can do so before ending your time registration.
To do so:
-
On the same page you registered time, fill in the Output Quantity field. Select Register.
How to end registering time on an operation
-
On the same page that you started your time registration, under the Lines heading, check the box under Finish Now in the line where you are registered.
-
On the ribbon, select Register.
Time registration for the operation has now ended.
Register indirect time
Setup
-
Search for and open Online Production Control Setup.
-
In the Cap. Jnl. Templ. Name Indirect Time and Cap. Jnl. Batch Name Indirect Time fields, select the journal template name and journal batch name you would like to use to register indirect time.
How to start registering indirect time
-
In Role Center, select the action Indirect Time.
-
A new page will appear. Select the code to which you would like to register time, then on the ribbon, select Start/Stop time.
-
A new page will appear. Fill in your machine center number, then on the ribbon, select Register.
This will set the start date to the current date and the start time to the current time.
How to end registering indirect time
-
In the same line that you filled in your machine center number, check the Finish Now box.
-
On the ribbon, select Register.
This will end the registered indirect time.
Note:
While a machine center is registered on an Indirect Time, the code will show up under Stop Code on the Resource Status page.
Suppress confirmation when posting
-
Search for and open Online Production Control Setup and enable the Suppress Dialog when Posting toggle.
Now, when you post time or output using OPC no confirmation dialog will be shown.
See a list of resources that are logged in
-
In the Role Center, select the Resource Status cue. On the page that appears you will see all the resources that are currently logged in.
Easily log a user out of time registration
-
To log another user out of time registrations (both production order operations and indirect time), on the Role Center, select the Resource Status cue.
-
On the page that appears, enter the machine center number of the employee in the Log Out Employee field and press Enter.
The user you selected has now been logged out.
Enable bar code scanning
To be able to use bar code scanning:
-
Search for and open Online Production Control Setup and enable the Enable Barcode Scanning toggle.
You will now be able to use bar code scanning to register time and output.
See the amount of time and output posted for the current day
-
In the Role Center, select the Capacity Entries cue. On the page that appears, you will see all the capacity entries for the current day.
Note:
If you have filled out the fields OPC Capacity Type Filter, OPC Capacity No. Filter and / or OPC Work Group Filter on the User Setup page, they will filter out entries that are not related to your selection.
Correct posted capacity ledger entries
Setup
-
Search for and open Online Production Control Setup.
-
Fill out the Output Jnl. Templ. Name Correction and Output Jnl. Batch Name Correction fields with the values that specify the output journal you would like to use for capacity ledger entry corrections.
How to correct entries
-
Search for and open OPC Capacity Ledger Entry List and select the entry you would like to correct.
Revert an entry
-
If you want to revert the entry you have selected, on the ribbon, select Correct in Journal.
-
A new page called Output Journals will appear, displaying a journal line that reverts the entry.
-
On the ribbon, select Post to post the new journal entry. You have now reverted the original entry.
Replace an entry with a new value
-
If you want to replace the entry you have selected with a new value, on the ribbon, select Correct and Post New Value.
-
In the new window that appears, enter a new value in the New Value field. Select OK.
-
A new window will appear to inform you that the new value has been posted. Select OK.
Easily register consumption
-
In the OPC Role Center, on the top ribbon, select Consumption Journal.
A new page called Consumption Journals will appear, allowing you to easily register consumption.
Add information messages
-
Search for and open OPC Information Message List.
-
On the ribbon, select New and write your message in the Description line that appears.
Your message will now appear under Description in the OPC Information Message box in the Role Center.
Print out the barcode for a production order
Setup
-
Search for and open Report Layout Selection.
-
Select the filter icon located on the ribbon to the left to open filter options.
-
Select a filter type by selecting + Filter. In the dropdown list that appears, select Report ID.
-
In the Report ID field that appears, write in (or copy and paste) the following ID: 99000762.
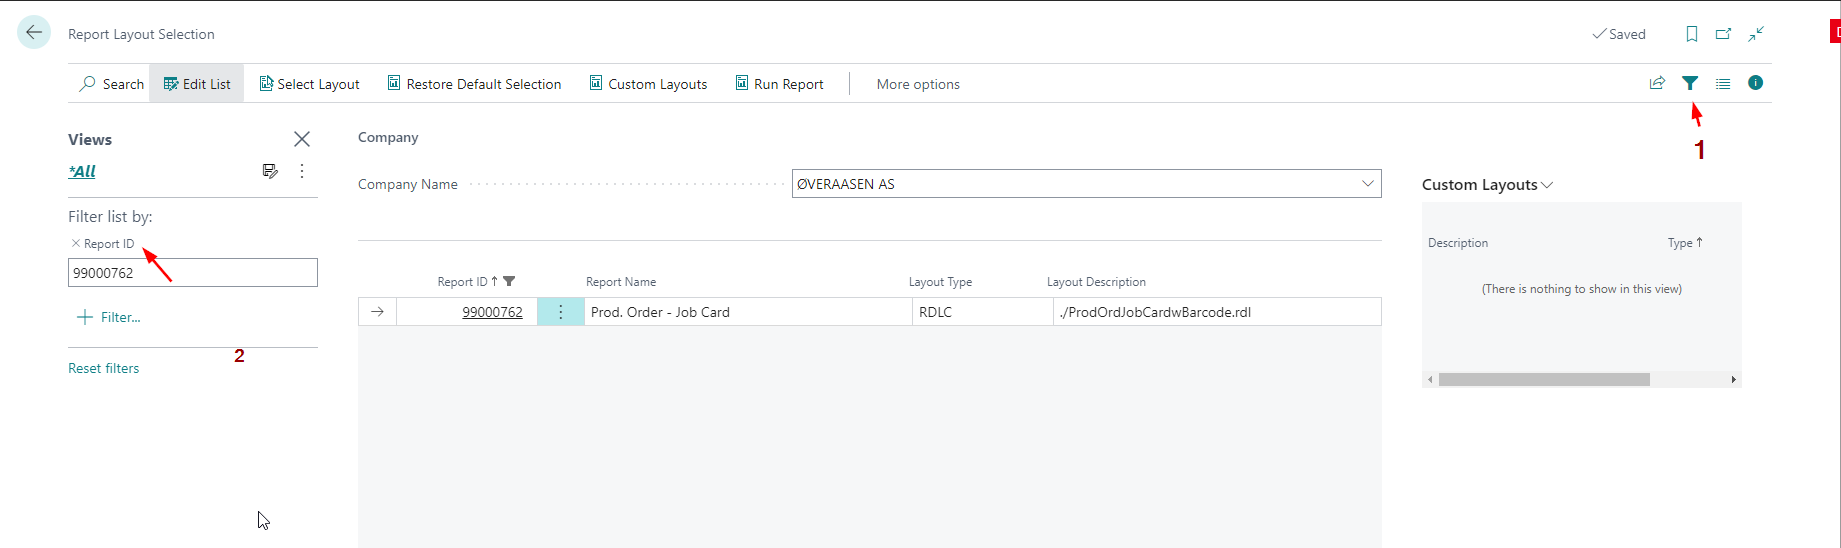
5. On the ribbon, select Select Layout. In the window that appears, select the line with the Layout Name: ./ProdOrdJobCardwBarcode.rdl.
Now, you can print out the barcode for any production order.
How to print out the barcode for a production order
-
Find the production order for which you would like to print out a barcode.
-
On the ribbon, select Print, then select Job Card (located below the top ribbon).
-
In the window that appears, select Print.